將作品數位化時最常困擾我的問題是品質,影響品質的元凶往往來自於作品的白色背景,因此我想出了用Photoshop後製的方式來改善問題。以下我將一步一步的示範如何修改。
The quality of works digitized sometimes bother me a lot. The root cause of this issue mostly originating from the appearance of white background. Therefore, I come up with using Photoshop to fix it. Please follow me step by step airbrushing the example.
問題描述:
背景過深,但調整的話又會影響到畫作的其它地方
背景過深,但調整的話又會影響到畫作的其它地方
Issue Descriptions:
Background is too dark, and modify it will affect the other part of work
Background is too dark, and modify it will affect the other part of work
修圖過程 (Step-by-step airbrushing)
首先,我使用魔術棒工具只圈選畫面的背景色。藉由調整容許度,我可以調整圈選的範圍
First, Use Magic Wand Tool selecting background only. You can tune Tolerance to control the region selected.
接著,複製選取的區域到新的圖層 (按 Ctrl+J)
Then, copy selected into a new layer. (Press Ctrl+J)
再新增一個白色的圖層到最上層 (按Shift+Ctrl+N, 然後填滿白色),現在我們有三個圖層了
Create another white layer above the copied layer. (Press Shift+Ctrl+N, then fill layer with white)
Now we get 3 layers.
按住鍵盤上的Alt, 然後將滑鼠油標移到此二個圖層之間,會出現一個油漆桶的符號。
Press Alt on keyboard and move the cursor to the boundary between white and copied layer , then a symbol of bucket appears.
Alt+ 移動游標到下面的位置
Alt + move cursor to the place below
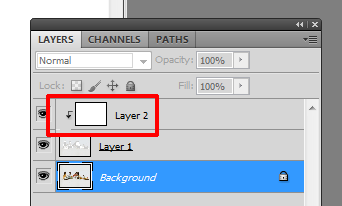
按下去後可看到白色圖層旁有箭頭出現,這表示白色只會在我們先前選取的背景範圍出現。如此一來便可以把背景改回白色而不影響到畫面的其他部份。
Click the mouse, and there will be a small arrow appears. It means the white only fill in the region of copied layer up without affecting the other part of work.

可調整白色圖層的透明度以最佳化背景色。
Modify the Opacity of white layer to optimize your new background.
對於一些塗錯色的小地方可用橡擦擦掉
If there are some defects on your new background, use the eraser eliminating them.
這只是最基本的修改技巧,其它的部分留給大家研究~ 有問題皆可以問~謝謝
It's just the fundamental airbrushing technique. If there is any question, plz tell me~Thx


沒有留言:
張貼留言